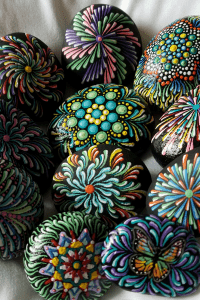
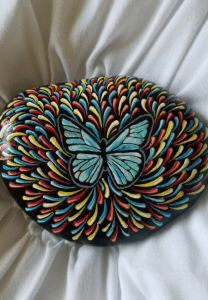
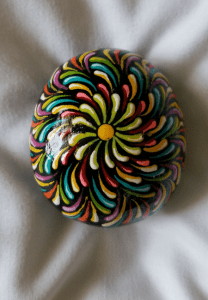
Today we have the Buffy Nevedal Rock Painting Artist Interview. I found Buffy’s artwork when I was on a Facebook auction site. Her “swooshy” designs definitely caught my eye and I knew our readers would love them too.
I had to buy one of her rocks for myself, so I could see the artwork up close. Her artwork is amazing and I think you’ll agree and want to learn a few of her tips and tricks.
Every month, we will be doing at least one artist interview, so make sure you subscribe so you don’t miss a single post. We will also be giving away a monthly artist rock only to newsletter subscribers.
Related Post: How to Find Ideas for Painted Rocks
Artist interviews will give you fresh ideas on painting rocks and techniques how to improve your skill set. Once you take a look at how adorable these rocks are, you’ll soon want to be painting some for yourself.
I have a rock painting group on Facebook called Rock Painting Ideas and Resources with over 23,000 members that you can get daily inspiration for rock painting.
If you love Pinterest (and who doesn’t?) you can follow me here.
Here’s the Buffy Nevedal Rock Painting Artist Interview:
Please tell us a little bit about yourself and the art you create.
I am mostly a self-taught artist, having only had art classes in high school, but nothing beyond that. My legal name is Joan, but I’ve been nicknamed “Buffy” since the age of two. I have a full-time career in cyber security and travel quite a bit for my work.
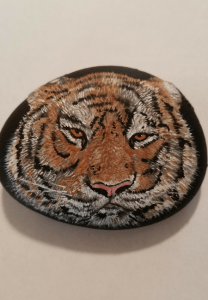
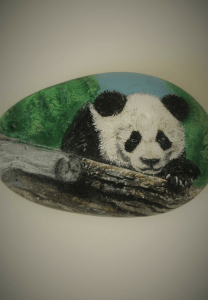
I create many types of art, to include: seashell art, mixed media, scratch art, and of course, my favorite – painting. I’ve developed my own “swooshy” style that is unique to me, but also love painting animals and dotting, as well as trying new mediums on rocks (water color, seashells, ink, joint compound, oil paints, modeling paste)
How did you get started rock painting and how long have you been doing it?
I used to live in Pennsylvania, where rocks were in abundant supply and readily available.
I always loved painting, so thought these little mini canvases would be a fun thing to try to paint on. After looking on Pinterest and Etsy for ideas and inspiration, I started painting rocks about four years ago.
Where do you get your inspiration from?
Anything and everything!
I see inspiration when I go for walks in the woods, at the zoo, at parks, when I see other art, animals in my yard, photographs, other artists designs, different shapes I see on road signage, etc.
I was even inspired by a cereal box once (because of the various colors on it).
What has been your favorite rock you painted and why?
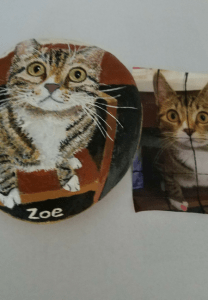
I would have to say a painting of my cat Zoe.
She is in one of those poses that I can’t help smiling at every time I see it. She jumped in one of my vanity drawers and was peeking out.
This was the very first animal I ever painted and it took me forever, but I learned so much by it and will treasure that rock always.
Do you like to jump from project or project or do you like to create clusters of themed stones?
Mostly, I like to jump around a bit. If I am painting a rock, I will need to let it dry before the second coat, so I will start something else.
Occasionally, I will do a cluster of themed rocks without changing my focus to other projects.
When you start a new series of rocks, do you sketch out the designs on paper or do you just start immediately on the stones?
I start immediately on the stones. I have an idea in my head, but it rarely turns out the way I pictured it.
The stones seem to dictate what they want painted on them more times than not.
Where do you get the beautiful rocks you paint on?
There is a rock quarry-type business 11 miles from where I live, and I will take a trip there about once-a-month and hand-pick them.
If I am in a bind, I will purchase them from Lowes, Home Depot or Amazon. I’ve also ordered a few boxes of Santorinis and Florida Flats from “Santorini #1 Rock Sales and More.”
Having recently gone back to Pennsylvania for a visit, I spent half a day picking rocks to bring back with me.
Is there a special brand of paint you like to use? Why is it your favorite?
I prefer Americana most of the time.
Some of the colors though are a bit too translucent and will need to be coated over two or three times for my desired outcome and vibrancy. The consistency is perfect for most of my projects.
What are some of your other favorite supplies?
Dotting tools (purchased from Kindness Rocks in Canada), nail stylus’, paint brushes of all sizes/types, Inktense pencils (although I am still trying to master them), and my throw-away contact lens containers – they make great little paint trays and you can just peel the paint off them once dry to reuse.
Is there a special tool you can’t live without? If so why?
Nail stylus’ for sure! I use them more often than brushes…as a matter of fact, when I do my swooshy designs, that is the only tool I will use (except for the black base coat).
Even when I paint my colorful flower mandalas, I use the stylus’ instead of a brush.
Do you participate in the kindness rock movement in addition to selling your rocks?
I do. I am a member of Art Abandonment and have left many rocks for that movement.
Also, when I go walking, shopping, to parks, restaurants, etc. I will leave random rocks.
I gift rocks to family and friends who are in charge of making auction baskets or for any type of fund-raising events, as well as occasionally send rocks out to those who’ve shown an interest in a particular piece but who do not have the means to purchase them.
What do you wish you knew about rock painting before you got started?
I wish I knew how addicting it was going to become. I would have mapped out a time management schedule. ?
What are some of the key elements in creating a rock painting?
For me, it is finding a rock that is not ridgy or rough. I find that sometimes, even if I think a rock is smooth, once I sit down and start painting it, it is too rough.
Also, the right paint for the project is key. As I said, Americana is my favorite because the swooshy art that I do requires a thinner, more flowy paint.
Dot mandalas, however, I like to use a thicker paint for the peaks in the dots.
Another key element is finding a good clear coat. I do not use Mod Podge, as it is not waterproof and the colors fade over time.
I am going to be experimenting with Art Resin as a sealer very soon. And one more thing – I like to clean up my pieces prior to sealing them. If the paint around the rock is not even, I will fix that. If there are skips in my swooshies, I will fix that as well.
What advice would you give to other rock painters?
I would strongly advise joining a rock painting social media community, whether it be in auction groups, rock trading group, art abandonment group, local rock hiding group, or creating your own group.
I find that we all learn from each other and bounce ideas off each other.
These groups keep me inspired, motivated, wanting to up my game and challenge myself. Also, continuously educate yourself on your particular interest or desired style.
Watch YouTube videos, participate in general art websites, buy books if that is your thing, subscribe to your favorite artists on Patreon.
Always continue to hone your skills, even if you are not sitting in front of the rock with a paint brush in your hand.
And finally, find your own style – it’s okay to learn from other artists, but find a way to make your art unique to you.
What would you say to a beginning rock artist that didn’t feel his or her work was up to par?
Rock painting, to me, is much tougher than painting on canvas because it is such a small canvas and I feel you must be more precise and details are a lot harder to fine tune.
Keep practicing and educating yourself. You may not think your work is that good, but anything you create that comes from your heart is beautiful.
Yes, the skills can be learned with time, but the vision is yours and the final product is as unique and beautiful as you are.
Also, when you get frustrated and want to quit, just say to yourself that it’s a learning process and you can always paint over and start again.
What is the most challenging part of being a rock painter?
Two things: 1) finding the perfect rock for the project; 2) trying to find and dedicate time for a project.
On the weekends, I spend most of the day painting, but during the week, I may only have half an hour, if that, to paint.
There are nights, however, when I will start painting, and before I know it, it’s midnight and I am exhausted the next day at work. It is challenging to find the right balance between my career and my passion.
Can you share with us what a typical day rock painting looks like to you?
I will give an example of a weekend day: I am an early riser, so up at 5, have two cups of tea, prep and base coat a bunch of rocks, decide if I want to paint designs, animals, real-life or try something new and then start painting.
I will take a break for lunch or dinner (sometimes), depending on how the painting is going. I will do that until around 10PM and then call it a night.
The next morning, I will sign and seal the finished pieces.
Where in your home do you paint? What does it look like?
I prefer my kitchen table because the lighting is best there. It looks like I am a disorganized, very messy person – paint bottles, brushes, stylus’, and rocks all over the table.
When company is coming over, I feel obligated to clean it up and put it away in boxes. But once the company leaves, not even an hour later, it’s like I never cleaned up at all.
What are some of your upcoming projects?
I am mostly working on different variations of my swooshy design for Etsy, since I haven’t put any of this style on Etsy yet.
How can people buy your artwork and find out more about you?
I have an art page on Facebook and an Etsy shop. I also belong to two auction sites where I list some of my rocks.
I would like to thank Buffy Nevedal for taking the time to share with us her ideas and techniques. If you want to get started on rock painting – check out the resources below.
Here’s how you get started on Rock Painting:
1) Rocks
You want smooth flat rocks to create your masterpiece unless an unusual rock acts as the body of your art piece. Keep your artwork ideas in mind when selecting the perfect stones.
Make sure you’re able to remove stones from where you find them. Removing stones from National and state parks isn’t okay. Taking rocks from waterways can also be against the rules. It’s also illegal to take rocks from railroad tracks.
If you live in an area that it’s hard to find rocks, head over to your nearest home improvement center, landscape supply store and garden centers to purchase some. Amazon ships this 30 pound bag of rocks for a great price.
2) Wash
Paint won’t stick to dirty rocks. A smooth surface is what we’re aiming for, so washing your rocks in warm water and soap will ensure that. You might want scrub it with an old toothbrush to make sure all debris is removed. Allow rocks to dry before painting.
3) Sand
If there is any light bumps or grit on your rock, you can sand using 150 grit sandpaper.
4) Primer
For best results, you’ll want to prime your rocks especially if the rock is pitted. This gesso primer is perfect for smooth results. You can find out more here.
5) Paint
Use acrylic patio paint for best results if you will be hiding your rocks outside. Adding a white layer before painting the color you want makes it pop. Let each layer of paint dry before applying the next layer. You can find acrylic patio paints here.
Shift paint is paint that shifts color as you look at what you painted. Shift paint can be found here.
6) Paint Brushes
A selection of various sized paint brushes will help you create the perfect look you are going for. This set has an amazing variety of sizes. They say watercolor paint brushes, but work wonderfully with acrylic paint. You can find them here.
7) Markers
Adding text with markers is easier than painting words. Through trial and error, I have found that Posca Markers work best for rock painting. Make sure you look at the tip size before purchasing to make sure you have the right size. I use the Ultra thin tip for outlining and writing words. You can find them here.
You could also buy this amazing set on Amazon. It’s the BUNDLE SET.
8) Fineline Applicator
This Fineline Applicator lets you control your artwork. You can find a set here.
These Fineline Applicator tops easily screw on to your paint. You can find them here.
9) Dots
Dotting tools make perfectly round dots. You can find a set on Amazon for an AMAZING price.
Here’s an inexpensive set of dotting tools and paint brushes combined. You can find them here.
10) Seal
This is one of the most important steps to rock painting. All that hard work that you put into your stone would be wasted with any type of moisture. You want a seal that won’t curdle if the stones are subject to the outdoor weather. Krylon Colormaster Spray is what I use. Two thin coats works best.
You could also use Krylon Low Odor Clear Finish. You can find it here.
For a non-toxic sealer, you can use DecoArt Varnish. You can find it here.
11) Brush Cleaner
How many have us have been guilty of not cleaning our brushes right away and throwing out a rarely used brush because of it? Soak your paint brushes in this and you’ll never have to do that again.
12) Brush Stand
It’s important to stay organized while you’re painting rocks. This wonderful paint brush stand will have your brushes ready when you want to paint. You can find it here.
13) Display
If you have a special rock that you want to display, you’ll need a display stand. You can find the three prong tulip display stand here. (The price is for 6 stands.)
14) Techniques
Here are my favorite books on rock painting. You can’t beat the price and you learn so many different styles. The Art of Stone Painting is a treasure chest full of amazing art that teaches you to create them too. You can find it here.
Mandala Stones will teach you how to master your dotting. You can find it here.
Art on the Rocks: 35 Rock Painting Projects and Tips. You can find it here.
We’ve reached the end of the Buffy Nevedal Rock Painting Interview. Don’t forget to subscribe to our newsletter to be eligible to win our monthly rock giveaway.
Make sure you pin the post below so you can refer back to it again and again.
Don’t forget to check out Rock Painting Ideas & Resources Facebook group here.
Thank you so much for visiting. Check out our other blog posts on rock painting. Rock On!



Phyllis Smith says
I am thrilled with your technique and video for painting rocks! Thanks for your help!
Rock Painting says
Hello Phyllis! Thank you so much for letting me know how much you liked the site. Buffy is amazing, isn’t she? Kelly